IMX SJR844 Strip Down
The Danube Delta was a revelation for my friend Razvan, at least in what his new rodbuilding project should be. After 3 days of fishing with his G.Loomis SJR 844, a gift from his wife, he decided that in order for him to fish with this rod again he’d have to convert it to a baitcaster. This baby had the backbone and the sensitivity needed for the task. One problem… who would strip his rod to a virgin blank?
Unfortunately for me, he was fishing with his favorite rodbuilder… ME! when his light bulb lit up. I just couldn’t refuse him. A unique project. I haven’t stripped down any rod from top to bottom, so I finally got my chance to do so.
From past topics on Rodbuilding.org and Tackletour I remembered that IMX and GLX rods didn’t have any topcoat whatsoever. I wish this would be right, but it wasn’t. They are protected by the thinnest coating I’ve seen so far. Luckily a light sanding does the trick in getting to the bare blank.
Ok! Let’s trace back our steps to see how do you strip a blank of all of its components. To start with, if you wish you could rinse the rod of any larger debris.
1. Do you speak Guide language?
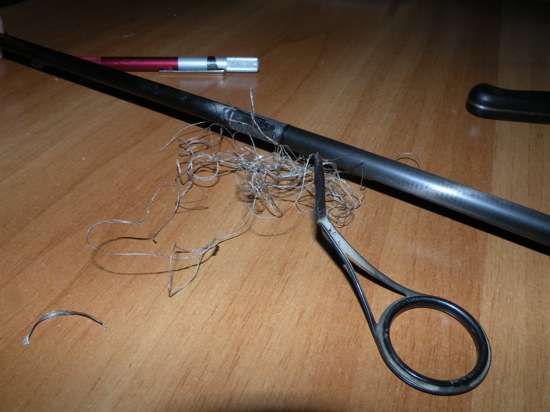
The Fuji Alconite were wrapped with what I believe was a C size thread, of unknown origin. Before getting your blade in the wrapping try warming the area with a hair dryer in order to make the epoxy finish more malleable. Then plunge into the base of the guide with an exacto blade. Try stripping to the left as you look at the guide. Fortunately I got the direction of the wrap straight on, and after cutting at the base of the guide I started unwrapping the thread. Unlike Megabass rods, the thread wrapping is single threaded. This means easy unwrapping, uninterrupted by other thread inlays.
The first guide is the toughest to take of, the rest will be a piece of cake.
Bulky epoxy remains
Ok. We have removed all the guides. But what about the epoxy residue that’s left after removing the guides? This is where the delicate work starts.
I use whatever metallic blade I have at hand, that’s not that sharp, to do the removing operation. You’ll probably think I’m nuts, but until now I haven’t been able to find a better solution for this. Plastic did not cut the mustard in this case. It work up to a point. If you get the angle of the blade right you’ll see that when you get to the blank it won’t scrape of any more material. What I love about this method is that you feel and control the entire operation. After you get the hang of it, it’s pretty straight forward.
I recommend warming the epoxy residue with the hair dryer first, for perfect results. After removing the residue from all of the guides I’ve removed I started sanding the blank on all it’s length with a 1000 grit sandpaper. After this operation you won’t see any difference in where the guides once were.
2. Can we keep the G.Loomis logo?
Who would have believed that Loomis stamped their rods, instead of applying decals like all the others do? This is just my fortune, as Razvan asked me to try to keep the original writing on the blank. I told him that only a miracle would do that, if he wants a Matagi lipstick on the rod.
Well… I got my miracle. You just have to be patient during this operation. I really can’t illustrate it with pictures, but a good set of nails will do the trick. Warm up the area with the hair dryer as best as you can, in order to soften the finish as much as possible. Unwrap thread above and under the sticker (or at least from under the sticker to have a point to start with), and after that try peeling the epoxy of the sticker by using your nails. It’s easier said than done actually. This operation took almost as much as removing all the residue epoxy from where all the guides used to be.
After removing the finish that was covering the original writing, you can remove the rest with a knife, or whatever blade you have at hand (don’t use the sharpest you find). I used a kitchen knife and the back of an exacto knife to finish it off.
3. Removing of the cork.
This is probably the easiest task so far. After removing the vinyl winding check and the vinyl butt cap you get right into it. The one where you don’t have to be that gentle. Just stick that knife in. The blank will have a thick enough layer of epoxy over it to be able to protect it from any harm. Roughly remove the cork, until you get to the bare epoxy on the blank. Here you go through the same stages as above. Hair dryer to soften up the epoxy and blade to remove it from the blank.
4. Super Sticker reel seat… hard to get, hard to remove
This is where the Dremelcomes in. No other tool will do the job better than a dremel. The Super Sticker reel seat is a pretty tough one to crack, if you haven’t used one before. Do a cross cut on the back of the reel seat, and one on the other. Be really careful with the dremel, because it gets pretty close to the blank. You don’t want to damage it, so be patient. After this operation I find myself using a wide screwdriver to spread the reel seat. You can figure this one out without further explanation. After this the same hair dryer, blade/knife operation to clean up the epoxy residue.

That's why they call it SuperSticker... Easy to put on, but hard to get of. Sticks to it's owner like SuperGlue.
After you remove all the residue epoxy, try finding a 800 grit sandpaper, to scrape the blank of whatever finish there’s left. A 1000, or a 1200 should finish the job, so there is no visible scratch.
After the sanding process wipe the blank clean with alcohol. It’ll need multiple wipes, until you have no residue on whatever you use to clean the blank with. And now it’s ready for the Matagi parts… just waiting for them to get here.
Until next time!… I’m going to have a blast building this one.


17 Comments
IKC bearing also try to get more feedbacks for the bearings which can be better applicable for Finishstye and others
IKC Bearings will make you finishing better
I haven’t checked in here for some time as I
thought it was getting boring, but the last few
posts are great quality so I guess I’ll add you back to my daily
bloglist. You deserve it friend
If I understand rod stripping correctly, you remove guides, reels seat etc. and then you sand entire blank with 1000-1200 wet/dry sandpaper to remove the previous finish and paint (it the rod was painted). Is this correct?
I have 2 older rods that I have removed the guides, seats etc. Wasn’t sure how to gel blank clean and smooth before I re-paint with appliance epoxy paint.
Hope I understood the process correctly.
Marty Howard
Panerai, Radiomir Atramentous seal PAM 183 Recollection of historic types of Panerai, the Atramentous Stamp is really a vigil with bewitching naturalness, swiss language watches autograph copy legible and smartly designed. Revise troops. Only for the story Within the 1940′s, some italian partners had the chase to woo youthful British ladies on Midland vacation. Furrowing furtively the lanes of Alexandria or La Valette, driving a 2-open space scooter, the Roman used Rolex wakefulness using the fashion of a cushion which continues to be modified by Panerai. The Florentine compact underlined the markers having a special luminescent paste known as the Radiomir. Necessary to time-fragment their performances within the smoky backrooms, the Panerai watches have joined relation because of these transalpine heroes. A least part of, this is exactly what Luigi explained when he entrusted me together with his Radiomir Ebon seal 183, to which i’ve to exhibit Gin for any couple of days
I have a G-loomas 5 ft ul that I striped to refinish ,after a light sanding with wet extra fine paper I noticed two rings around the rod indenting into the rod and perfectly simetrical ‘ is this a flaw in the rod or are they made that way. the guides are not covering these areas.maybe when i put the guides back on i shoiuld place the foot over these places and even under wrap just under the foot. please let me know what you think, thanks a lot Rollie PS i was very caefull about striping and didn”t get into the graphite.
My spouse and I absolutely love your blog and find most of
your post’s to be precisely what I’m looking for. Does one offer guest writers
to write content available for you? I wouldn’t mind creating a post or elaborating on some of the subjects you write in relation to here.
Again, awesome website!
i have stripped the eyes off a carbon beachcaster what can i use to remove the remaining residue thanks
cool idea. and the need to upgrade itself as bait. and then have a pen and scratch hand crumbles
How is this project going?
Have you installed Matagi parts?
I need to change the reel seat on a Beastmaster CX 240H, I guess I just have to strip down the reel sit following your instructions and put on the new (customized) reel seat.
How do I “glue” new reel seat?
Salut, Andrei !
Ai reusit sa indepartezi reziduurile de pluta si adezivul epoxi de dedesubt ? Incerc sa fac un split handle dintr-unul normal.
Ma gandeam sa aplic caldura cu un feon dar imi e frica sa nu stric ceva la blanc.
Daca ai vreun sfat in sensul asta, as fi recunoscator.
Multumesc !
I have noticed you don’t monetize your website, don’t waste your traffic, you can earn extra bucks every month
because you’ve got hi quality content. If you want to know
how to make extra $$$, search for: Mrdalekjd methods for $$$
Hi there,I read your blogs named “How To Strip a Rod in 4 “Easy” Steps | Fishinglifestyle.net” like every week.Your humoristic style is awesome, keep doing what you’re doing! And you can look our website about اغانى 2018.
Hello to every body, it’s my first pay a quick visit of this web site; this weblog includes
amazing and truly fine information in favor of readers.
I have read several good stuff here. Certainly price bookmarking for revisiting.
I wonder how much attempt you place to create
the sort of magnificent informative site.
each rod blank has a spine..and when the rod is flexed under load, the rod builder positions the spine so as to get the most strength from the blank..maybe just the good builders with good blanks..but anyway..if I take a rod down to the blank, I mark the guide spacing and top of the blank with red majic markers for putting it back together..research it for yourself..just a heads up..maybe an old myth…who knows…ha
If some one wants expert view concerning blogging after
that i recommend him/her to pay a quick visit this webpage,
Keep up the nice job.
3 Trackbacks
4 Layer Fishing Rod Case…
[...] sand entire blank with 1000-1200 wet/dry sandpaper to remove the previous finish [...]…
barc recruitment…
How To Strip a Rod in 4…
marketing En redes sociales…
How To Strip a Rod in 4 “Easy” Steps | Fishinglifestyle.net…